World's Best Bread
No-knead Dutch oven bread in 12 hours. Mix in the morning, bake tonight.
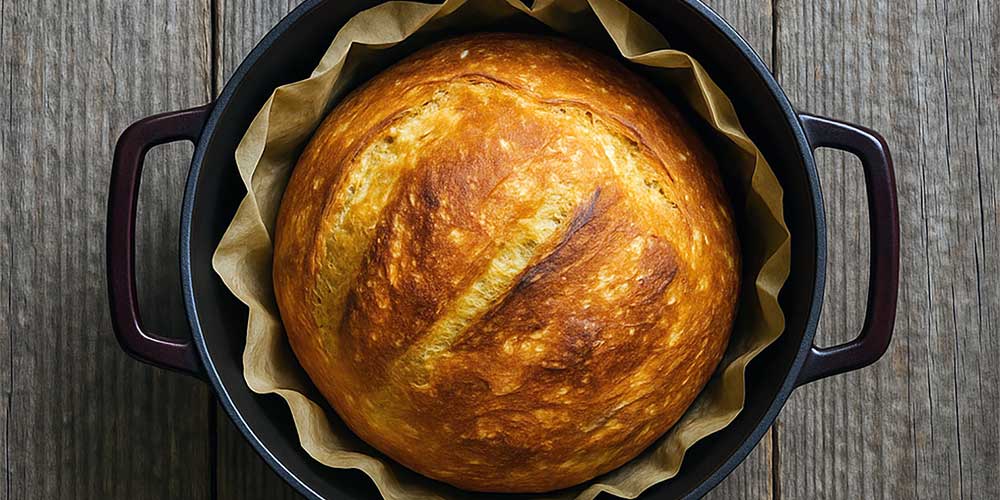
Introduction
I'm Chris. I got into baking during covid and worked through hundreds of complicated breads: levains, long autolyses, the lot. What I learned is that you can get a loaf almost as good with a fraction of the effort. This is that loaf, and it's the one I bake now.
Four ingredients and five minutes of stirring. The long rest builds the flavor, and the hot pot gives you the crust.
Baked it? Email me a photo at chris [at] lol.dk and your loaf goes on this page.
Ingredients
| Volume | Weight | |
|---|---|---|
| Bread flour's higher protein content creates a chewier texture with larger air pockets. | 10 dl | 600g |
| Kosher salt brands differ a lot by volume. Morton is denser than Diamond Crystal, so the spoon measure depends on the box. Weighing avoids the guesswork. | 2½ tsp Morton, or 4¼ tsp Diamond Crystal | 12g |
| Sourdough starter adds complex tang and requires longer fermentation. | ¾ dl | 80g |
| Water at room temperature | 5 dl | 500ml/g |
Other Supplies
- Dutch oven
- Large mixing bowl
- Bowl lid, kitchen towel or plastic wrap
- Small bowl for pre-mixing yeast
- Parchment paper
- High heat-resistant oven mitts
- Wire rack
- Kitchen scaleOptional, but you will get a more consistent loaf if you weigh your ingredients.
- Spatula or wooden spoon
Instructions & Timeline
Mixing (15 minutes)
- Prepare the yeast: Mix the sourdough starter with 2 tablespoons of the water until well combined.
- Mix the dry ingredients: In a large bowl, mix together the bread flour and the kosher salt until well combined.
- Add water and starter: Add the yeast mixture and remaining water and stir with a wooden spoon or spatula until a shaggy dough forms. The dough will look rough and sticky. That's right.
- Cover: Cover the bowl with a lid, plastic wrap or a damp kitchen towel.
- Bulk rise: Leave the bowl on the counter, at room temperature, for bulk fermentation. Keep the bowl at room temperature. Sourdough starter works slower than commercial yeast and needs the warmth even on the long schedule.
Folding (10 minutes)
- Fold the dough: When the surface of the dough is dotted with bubbles, it's ready. Generously flour your work surface, then turn the dough out onto it. With floured hands, fold the dough over itself once or twice to form a round loaf.
- Transfer to a bowl: Place a piece of parchment paper in a bowl and dust it generously with flour. Place your shaped dough onto the parchment paper, seam side down.
- Cover: Cover the bowl with a lid, plastic wrap or a damp kitchen towel.
- Second rise: Leave the bowl on the counter, at room temperature, for the second rise. Keep it at room temperature so it rises.
- Preheating: Place your Dutch oven (with lid) in the oven and preheat to 230°C. Your oven may say it's ready in 15 minutes. The cast iron isn't. Give it the full hour.
Prepare for baking (5 minutes)
- Transfer dough: Carefully remove the Dutch oven from the oven. Using the parchment paper as a sling, transfer the dough to the Dutch oven. Scoring: Score the top with a sharp knife or a lame. One slash is enough. It decides where the loaf opens instead of leaving that to chance.
- Cover and bake: Place the lid on the Dutch oven and return it to the hot oven.
Remove lid (1 minute)
- Remove lid: Carefully remove the lid from the Dutch oven to allow the crust to brown.
Cooling (At least 1 hour)
- Remove and transfer: Carefully remove the bread from the Dutch oven and transfer to a wire rack.
Enjoy your bread
- Done: Your bread flour loaf with sourdough starter is ready after 12 hours. Slice it while the crust still crackles.
Nutrition Facts
Per serving (1 slice, approximately 1/12 of loaf):
| Nutrient | Amount | % Daily Value* |
|---|---|---|
| Calories | 180 | |
| Total Fat | 0.8g | 1% |
| Sodium | 390mg | 17% |
| Total Carbohydrates | 36g | 13% |
| Dietary Fiber | 1g | 4% |
| Sugars | <1g | |
| Protein | 6g |
*Percent Daily Values are based on a 2,000 calorie diet. Your daily values may be higher or lower depending on your calorie needs.
Frequently Asked Questions
Why is my dough too wet/sticky?
This is a high-hydration dough, which means it should be sticky. Don't be tempted to add more flour during the initial mix. Use plenty of flour when handling the dough during shaping to prevent sticking.
Can I make this bread if I don't have a Dutch oven?
While a Dutch oven creates the best environment for steam and heat circulation, you can use any oven-safe pot with a lid. Alternatively, you can place a baking sheet in the oven while preheating, then place the dough on it and add a separate pan with water on a lower rack to create steam.
How do I store the bread?
For the best crust, store at room temperature in a paper bag or wrapped in a clean kitchen towel for 1-2 days. Never refrigerate artisan bread as it accelerates staling. For longer storage, slice and freeze in an airtight container for up to 3 months.
How can I tell when my bread is properly proofed?
Properly proofed dough will have increased in size by about 30-50% and will slowly spring back when gently poked with a finger, leaving a slight indentation. If it springs back immediately, it needs more time. If it doesn't spring back at all, it may be overproofed.
Why didn't my bread rise as much as expected?
This could be due to several factors: your yeast might be old or inactive, the room temperature was too cold for fermentation, or the dough was underproofed. Make sure your yeast is fresh and allow for longer proofing times in cooler environments.
Can I add mix-ins like herbs, cheese, or nuts to this bread?
Yes. Add them at the fold. Herbs and spices: 1 to 2 tablespoons. Cheese, nuts or dried fruit: half a cup to a cup. Wet things like olives push the hydration up, so hold back a little water.
Why did my bread crack in unexpected places?
Unintended cracks usually occur when the scoring isn't deep enough or when the dough was underproofed. Score about 1/4 to 1/2 inch deep with a sharp blade at a 45-degree angle to control where the bread expands during baking.
How can I get a crispier crust?
For an extra crispy crust, leave the bread in the oven with the door cracked open for an additional 5-10 minutes after the baking time. Also, ensure your oven is properly preheated and that you're creating enough steam during the initial baking phase.
My bread didn't get as dark as I wanted. What can I do?
For a darker crust, try increasing your oven temperature by 15°C for the first 15 minutes of baking, then reducing to the recommended temperature. You can also brush the dough with water before baking or leave it in the oven a few minutes longer. Adding 1 teaspoon of honey or sugar to the dough can also promote browning.
Can I make this recipe with a stand mixer?
You can, but there's no point. This dough only needs to be stirred until no dry flour is left, which takes a minute with a spoon. The long rise does the gluten work a mixer would do. If you use one anyway, run it on low just until the dough comes together and stop.
How can I get larger holes in my bread crumb?
For an open crumb with larger holes, use higher hydration (add 25-50g more water), handle the dough very gently during shaping to preserve air bubbles, ensure proper proofing, and create good steam in the oven. Longer fermentation times also help develop a more open crumb structure.
How do I maintain my sourdough starter?
Feed your starter regularly with equal parts flour and water by weight (e.g., 50g starter + 50g flour + 50g water). If kept at room temperature, feed daily. If refrigerated, feed once a week. Always discard half before feeding to maintain manageable quantities. A healthy starter should double in size within 4-8 hours of feeding and have a pleasant, slightly tangy smell.
How can I tell if my sourdough starter is ready to use?
A ready starter should have doubled in volume since its last feeding, show lots of bubbles throughout, and pass the "float test": a small spoonful should float in water. It should smell pleasantly sour and yeasty, not overly acidic or alcoholic. For best results, use your starter 4-8 hours after feeding when it's at peak activity.
Why is my sourdough bread not as sour as I'd like?
Sourness develops from longer fermentation at room temperature. To increase sourness: use a higher percentage of whole grain flour in your starter, let the dough ferment longer at room temperature (try the 24-hour method which gives more time for acid development), or use a more mature starter that's been fed 12-24 hours ago rather than at its peak. You can also reduce the amount of starter slightly and extend the bulk fermentation time. Unlike commercial yeast recipes, sourdough should always ferment at room temperature, not in the refrigerator, as the wild yeasts need warmer temperatures to stay active.
Why use bread flour instead of all-purpose?
Bread flour has a higher protein content (12-14%) compared to all-purpose flour (10-12%), which develops more gluten during mixing and fermentation. This creates a chewier texture, stronger structure, and better oven spring. The extra protein also allows the dough to hold more gas from fermentation, resulting in better rise and a more open crumb. If you prefer a softer, more tender crumb, stick with all-purpose flour.